Skip to product information
EventCAM 2D Recorder

EventCAM 2D Recorder

XMR-J335

EventCAM 2D is an industrial event recording  camera with high-performance image capture and video processing capabilities. It is capable of capturing and recording events within the industrial control system in real   time, generating important short video records for further analyze and monitor. At the same time, it features in dus- trial data collection and protocol streaming functions. It can integrate with PLCs or robots to obtain real-time status from the control system,  including fault alerts, production signals, workpiece scanning results, etc. With comprehensive industrial bus communication protocols, it facilitates seamless integration with production lines. EventCAM 2D offers    ultra-high 4K resolution and 240FPS frame    rate. High-performance SOCs, ISPs, and low- latency video encoding IP are utilized in entCAM 2D to ensure image quality.

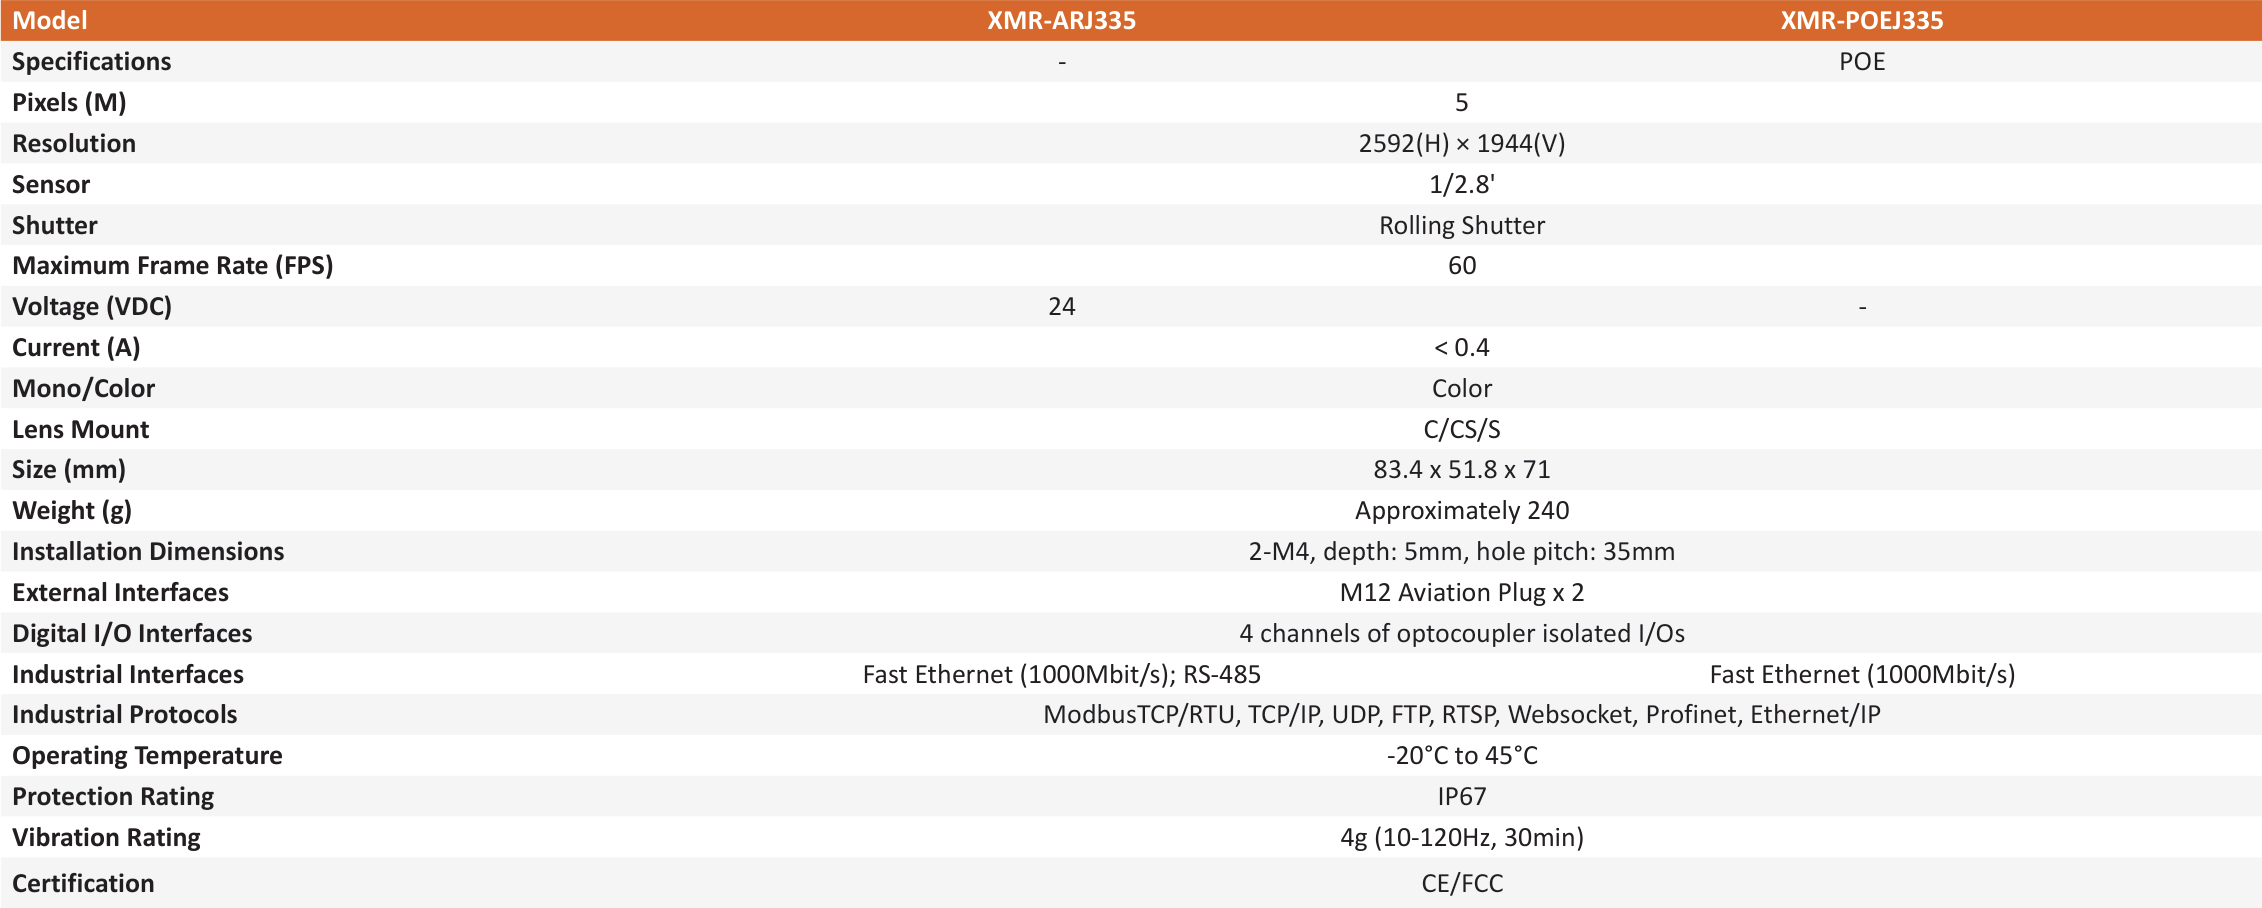
Product specifications
Downloads

Product Catalog
Product Manual

Popular FAQs for EventCAM 2D Recorder

Why can't I plug in the network cable?

The camera cable has a fool-proof design, and if the cable cannot be plugged in after repeated rotations, it means that the cable does not have the correct connector.

The GPIO screen display is different from the actual state

The terminal board module is abnormal, the 25-pin plug is not plugged in place, or the line is faulty.

Video camera mounting height

The safety camera uses a fixed focal length lens, the height of which is determined by the minimum resolution that the algorithm can recognize. The installation height should not be too high, once it exceeds a certain limit, it will lead to a decrease in the accuracy of safety identification. The recommended installation height ranges from 2.8 m to 3.5 m. The relationship between the mounting height and the camera's field of view can be found in Table 1 of Section 4.3.1.

The browser display is not working properly or the video is not playing properly

Refer to the manual before configuration, and after correctly configuring the IP address of the PC, check as follows:

  1. Check whether the network cable is normal, whether the camera end is tightened, whether the network cable on the PC side is plugged in, and whether the network port light is on normally.
  2. In the browser, check whether the IP address entered is the IP address of the current debugging camera
  3. This web terminal does not support IE and Edge browsers, Google and Firefox browsers are recommended.
The setup tool does not start properly

The product configuration tool is a web browser, and it is recommended to use Google and Firefox.

Considering the compatibility of different Windows versions, when the browser does not start normally, you can try the following:

  1. In the software properties, set the program to "Start with Compatibility Mode > Windows XP".
  2. Update your browser to download a version that is compatible with your current Windows.
The solution cannot be deleted

It cannot be deleted when there is only one solution in the camera system. If the current solution does not meet the detection requirements, you can modify the current solution. Or create a new solution to save and run the current solution.

Unable to add a solution

When adding a solution, duplicate naming is not allowed. Check the solution name, and if there is already a solution with the same name, change the name of the added solution.

When the laptop is connected to the camera, it cannot be pinged and cannot open web pages
  1. Confirm that the cable is properly connected. Check whether the camera end is tightened, whether the computer end is plugged in, and the network port indicator lights up normally.
  2. You can try turning off the wireless network card and trying again.
The setup tool is unable to connect to the camera
  1. Check that the network cable is plugged in.
  2. Check the network settings of the computer running this tool, the default IP of the camera is 192.168.1.127, 192.168.1.128, the subnet mask is 255.255.255.0, the computer needs to ensure that it is in the same network segment as the camera, 192.168.1.xxx, for example, the computer IP address is set to 192.168.1.3, and the subnet mask is set to 255.255.255.0. When manually setting the IP address of the computer, please set the last digit between 2~254 (including 2 and 254), and the IP address cannot conflict with the IP addresses of other devices under the network segment, that is, it cannot be the same as their IP addresses. When using a router, you can ignore the above situation, and the router will automatically assign an IP address to the computer.
How to determine that the product is functioning properly

When receiving the product for the first time, the user should first inspect the appearance of the product, confirm that there is no damage, and then install the camera correctly in accordance with the equipment connection and operation guidelines described in Chapter 4, and set up a warning area in the appropriate position to complete the setting. After the installation process is complete, it is recommended to verify whether the product functions properly by following the following steps:


A warning area test is performed to confirm that the camera is capable of outputting according to the established scheme. If the output is abnormal, first check whether the program settings are accurate, and then reconfirm whether the camera is properly installed, including checking the installation angle and other details.

During the long-term use of the product, it is recommended to conduct regular functional checks to ensure normal operation.

Trial Application

This information is used only for communication and understanding of your product and solution needs.